So yesterday I posted that I was puzzled by the way Kivy deal with transformations (Rotate, Translate and Scale). Especially, the  way RelativeLayout relates with all of this. Please read my previous post first: Rotate, Translate, Scale and RelativeLayout in Kivy .

I actually asked in StackOverflow and I get an insight and I think I am about to understand what is happening here.

This involves 2 Kivy basic instructions (PushMatrix and PopMatrix) that I completely ignored before. Their names are unfortunately very misleading from the way I am seeing things. Here is a what the kivy documentation indicates:

  • PushMatrix: "PushMatrix on context’s matrix stack" [1]
  • PopMatrix: 2Pop Matrix from context’s matrix stack onto model view" [2]

I don't think that is very helpful. This has something to see with OpenGl which I have never worked with and it is probably the source of all my misunderstandings here.

So I ll try to put things in the way I see it. I understand that Push and Pop are operations in a Stack [3]. But what are they pushing and popping? They push and pop the current context of the canvas. Let's see the example first. In my previous post I had two options to solve my transformation: undo all the transformations and use RelativeLayout. Here is a 3rd option using push and pop.

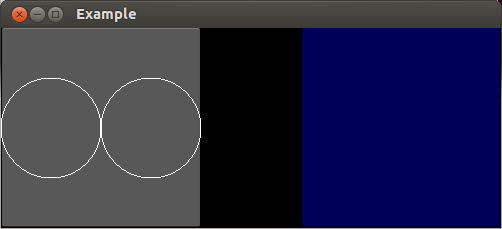
Option 3 - Using Push and Pop:

<Example>:
    Button:
        pos: [0,0]
        size_hint: [None, None]
        size: [200,200]
        canvas.after:
            PushMatrix:
            Line:
                circle: [50, 100, 50]
            Translate:
                x: 100
            Line:
                circle: [50, 100, 50]
            PopMatrix:
    Button:
        pos: [200,0]
        size_hint: [None, None]
        size: [200,200]
        background_color: [0,0,1,1]

So the PushMatrix and PopMatrix actually push and pop the original context. Moreover, this is what RelativeLayout is doing in its internal code, together with an expected translation to the position of the widget.

So what is this matrix? I resisted to believe that the matrix is a drawing space of the size of the screen. For example, a matrix of 800x600 that we are popping and pushing constantly. The Kivy documentation explains it here and I think I got the answer. It reminds me my course on linear Maths 10 years ago.

The idea is that you can save many transformations in a simple matrix and then applied to any vertex instruction (lines, polygons, etc) you were about to draw. For example, before you are going to display a Line,you apply (by mathematical matrix operators) the matrix to the points of the line. A matrix can save many transformations, I honestly don't remember if all of them but surely can rotate, translate and scale figures.

I started to see my general problem here. A Kivy canvas is not a canvas like when you paint but this will be another post.

[1]  http://kivy.org/docs/api-kivy.graphics.html?highlight=pushmatrix#kivy.graphics.PushMatrix

[2] http://kivy.org/docs/api-kivy.graphics.html?highlight=popmatrix#kivy.graphics.PopMatrix

[3] http://en.wikipedia.org/wiki/Stack_(abstract_data_type)

I have been puzzled by the way Kivy deal with transformations (Rotate, Translate and Scale). The Kivy documentation says that "each widget in Kivy already have by default their Canvas"[1] but that doesn't seem the case. At least in practice, it seems that all widgets share the same canvas as if it were a Reference.

Here is the very basic main.py

# main.py
from kivy.app import App

class Example(Widget):
    pass

class ExampleApp(App):
    def build(self):
        return Example()

ExampleApp().run()

Now we have this very simple python code. There are 2 buttons, both of 200x200 pixels. I want the first next to each other, so I position the first in the (0,0) coordinate and the second one in the (200,0) coordinate. Also, I want to circles in the first Button so I use the canvas.after for that. I draw one circle of radio 50px, translate the canvas of the Button (which is a Widget) 100px (the diameter of the first circle), and draw exactly the same circle again after the tanslation so I have one circle next to each other.

<Example>:
    Button:
        pos: [0,0]
        size_hint: [None, None]
        size: [200,200]
        canvas.after:
            Line:
                circle: [50, 100, 50]
            Translate:
                x: 100
            Line:
                circle: [50, 100, 50]
    Button:
        pos: [200,0]
        size_hint: [None, None]
        size: [200,200]
        background_color: [0,0,1,1]

I executed this with python main.py --size=500x100. The following Figure shows my result.

one

How come there is a black space in between both of them? I was expecting for this instead:

two

The Translate is affecting the whole drawing space of the window. This is a very control environment so we can guess what is happening but in real scenarios things can get completely misleading. A rotation could be the end of your interface. At this point we have two options:

Option 1 - Undo all the transformations:

Make sure to undo all the transformations we applied to the canvas. This is why it seems that the canvas is share by all the Widgets.

<Example>:
    Button:
        pos: [0,0]
        size_hint: [None, None]
        size: [200,200]
        canvas.after:
            Line:
                circle: [50, 100, 50]
            Translate:
                x: 100
            Line:
                circle: [50, 100, 50]
            Translate:
                x: -100
    Button:
        pos: [200,0]
        size_hint: [None, None]
        size: [200,200]
        background_color: [0,0,1,1]

Option 2 - Use the RelativeLayout:

If we embed the button inside the RelativeLayout, our problems are also solved.

<Example>:
    RelativeLayout:
        pos: [0,0]
        Button:
            pos: [0,0]
            size_hint: [None, None]
            size: [200,200]
            canvas.after:
                Line:
                    circle: [50, 100, 50]
                Translate:
                    x: 100
                Line:
                    circle: [50, 100, 50]
    Button:
        pos: [200,0]
        size_hint: [None, None]
        size: [200,200]
        background_color: [0,0,1,1]

This brings me to a question I am still trying to find. What exactly a RelativeLayout does? The documentation talks about relative positioning [2] but I was not expecting the impact in the whole transformation sets of Rotate, Translate and Scale. The first two could be considered positioning in certain way. Not that clear for scaling.

EDIT: I found and answer for this and posted it here. It leads to another option:

Option 3 - Using PushMatrix and PopMatrix


[1] http://kivy.org/docs/api-kivy.graphics.html

[2]http://kivy.org/docs/api-kivy.uix.relativelayout.html?highlight=relativelayout#kivy.uix.relativelayout.RelativeLayout

Kivy is an open source library for rapid development of applications that make use of innovative user interfaces, such as multi-touch apps". It works very well except that the documentation is not fantastic. The introductory tutorial is excellent but after that things start to get complicated.

Specifically, Javier and me struggled with the design of the interface. After a weekend reading the documentation and even code, we finally came with a solution that still feels sort of hacked, specially the coordinates (x,y) of the events. However, there were also nice surprises that start to explain some (at the beginning) weird decisions in the kivy arquitecture.

Since it is difficult to enumerate all the mysteries that we solved out, I will got through the code. The first important thing that you should know about Kivy is that it is not merely python. They have their own Kivy language. Even though, it is possible to use all the library with python, there are several advantages of the Kivy languange that will save you lots of code.

The kivy code is saved in files .kv. To use this code, all you need is

from kivy.lang import Builder
Builder.load_file ('path/to/file')

The other important thing is to distinguish between Apps, Widget, Canvas and Graphics.

  • App is generally one and will control your program. It needs at least one Widget.
  • Widgets. I would divide this in three types:
    • Form components: any button, label, textfield or similar
    • Layouts: these are basically panels in which you can sort other widgets (AnchorLayout, GridLayout, BoxLayout, etc)
    • Image: in our particular application, the most important one
  • Canvas. Here is where the confusion begins and I am still not sure if I am totally right. It seem that there is just one canvas and it corresponds to the "drawable" part of the App (the app, not the widget). And this brings problems because when you capture events it could be produce in any area of the App (except the areas occupy by widgets that captures their own events such as buttons).  The problem is that you have to calculate your own relative coordinates from the absolute ones.
  • Graphics. This are objects that you can draw in the canvas: rectangles, ellipses, etc.

A minimal application will look like this

from kivy.app import App
from kivy.lang import Builder
from kivy.uix.floatlayout import FloatLayout
Builder.load_file('gamex.kv')
class Controller(FloatLayout):
    # Class attributes....

def __init__(self, **kwargs):
    super(Controller, self).__init__(**kwargs)
    #some initial configuration but be very careful
    #because kivy is quite sensitive with the constructor
    #use the .kv instead

class ControllerApp(App):
    def build(self):
    return Controller(info='Hello world')

if __name__ in ('__android__', '__main__'):
    ControllerApp().run()

The file gamex.kv is actually the one that organize the interface which you can see in the next picture. Some details are missing but basically it has three components. The image, a right-side menu and a bottom menu.

I will try to give you some clues of the code:

  • Line 1: it's mandatory and specify the kivy version.
  • Line 3: it has to have the same name of the first widget of the application. Look in the previous python minimal example. The rest of the code is indented inside of this line so it belongs to controller
  • Line 4 to 7: The right side of the assignations must be attributes in the class Controller. The second part of the assignation are ids for some of the components of the interfaces. I will be back to this at the end.
  • Line 9 to 11: This correspond to the image component of the interface. Anchor layout means that the position is going to be set by two of five types of references: top, bottom, right, left and center. One of the references set the x axis and the other the y axis. So in total there are nine combinations. In the example the layout is going to use the top-left part of the widget.
  • Line 15: We can reference the attributes of the class using the variable root. The nice thing is that if the attribute change, then the interface is updated automatically.
  • Line 16: Complements the previous 9 to 11. The size_hint of the image (not the AnchorLayout as you would expect) is the one that stablish the size of the Layout.
  • Line 19 to 40 are not important.
  • Line 43: This is going to define the right list of buttons. The size hint is set in Line 49
  • Line 47: Stablish a BoxLayout to organize the buttons. In this case the buttons are actually kivy images. The problem we found with the buttons is that if you assign and image to a button, then the image is distorted.
  • Line 96:  It has a very similar structure to line 43 and correspond to the bottom components. In this case we use buttons and labels since we didn't need to put images.

This kivy languages already have saved us a lot of code in our interface but also there is another important detail that I need to explain. It corresponds to lines 4 to 7. As I said these assignations corresponds to attributes inside the class and ids inside the kivy code. So, for example, the line 4 assigns the id _paint to the attribute paint (the attribute in the final code is here). The _paint is in line 14 and also you must add the attribute to the class. The previous python code will look like this:

class Controller(FloatLayout):
# Class attributes....
paint = ObjectProperty(None)

I guess that's it. I didn't expect to say that much. Thanks.